
Oct 20th 2025
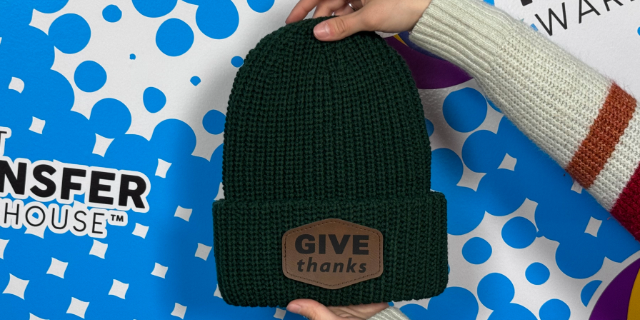
Give Your Beanie a Bold Upgrade with Brick HTV
Want to create a unique, textured design that pops on your beanies? Using Brick HTV (heat transfer vinyl) on a patch is the perfect method. Instead of pressing directly onto stretchy knit material, you’ll press your Brick HTV onto a patch first—then attach that patch to your beanie. The result is a professional, raised design that holds its shape, looks incredible, and lasts all season long.
Why Use Brick HTV on a Patch for Beanies?
- Greater control over placement: You can press the HTV cleanly onto the patch first, then position the patch exactly where you want on the beanie (front center, side, cuff, etc.).
- Better press conditions: Patches (e.g., twill, duck cloth, canvas) are generally easier to press on than stretch-knit beanie fabrics, giving more consistent pressure and temperature transfer.
- Dimensional impact: Brick HTV is much thicker than standard HTV, giving raised texture and visual interest.
- Removability or replacement: If the patch ever gets damaged or you want a new design, you can replace the patch instead of redoing the entire beanie.
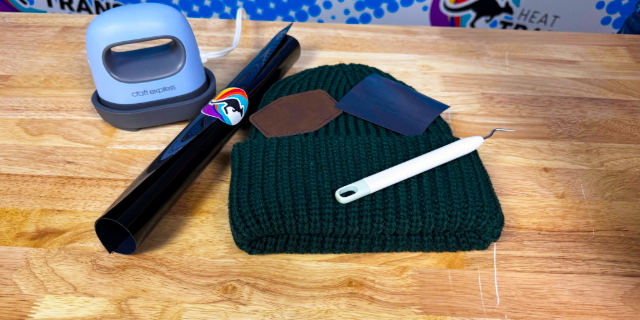
Materials & Tools You’ll Need
|
Item |
Recommendation |
Notes |
|
Brick HTV |
Siser Brick or compatible |
Around 600 microns thick—much thicker than standard HTV (~90 microns). |
|
Blank patches |
Twill, canvas, duck cloth, leatherette or felt |
Choose a fabric that will press well and hold the design. |
|
Beanie |
Knit or fleece cuff beanie |
Must provide a surface for patch adherence. |
|
Heat press |
Up to ~320 °F, with stable pressure |
A small platen press for patches is ideal like this craft press mini. |
|
Cutting/plotter machine |
Graphtec, Silhouette, etc. |
Capable of handling thicker HTV. |
|
Weeding tools, Teflon sheet, parchment paper |
— |
For safe pressing and removal. |
Step 1: Prepare Your Design & Cut Settings
- Mirror your design before cutting.
- Use strong pressure/force. Brick HTV is thick, so increase your cutting force.
- Avoid fine details. Tiny text or thin lines may lose sharpness due to the material’s thickness.
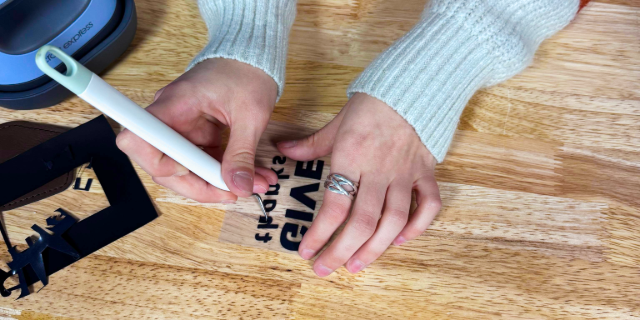
Step 2: Weed Carefully
- Remove excess material slowly, especially around edges.
- Use fine weeding tools for small parts.
- Be patient—rushing can peel off design elements unintentionally.
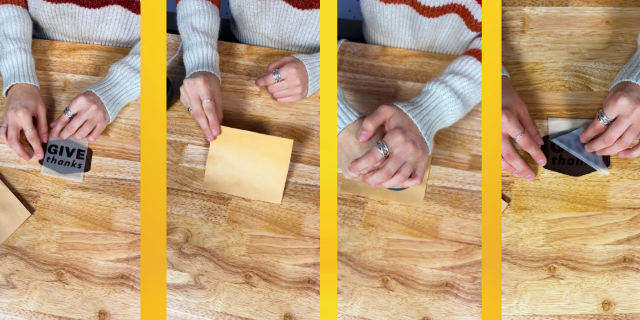
Step 3: Press the HTV Onto the Patch
Because you’re pressing on a patch (not directly on the beanie), you’ll have more control and even heat distribution.
Suggested press settings:
|
Step |
Temperature |
Time |
Pressure |
Notes |
|
Tack press |
305–320 °F |
10 sec |
Medium |
Helps design stick before final press. |
|
Final press |
305–320 °F |
15–25 sec |
Medium-firm |
Ensures full bond. |
|
Peel |
Cold peel |
— |
— |
Let fully cool before removing liner. |
Tip: Use a Teflon or parchment sheet to prevent scorching.
If possible, test on a scrap patch first to fine-tune time and pressure.
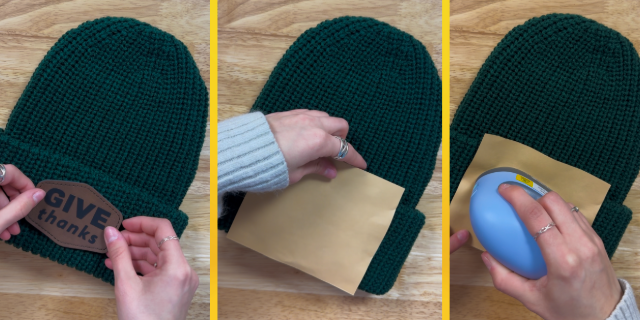
Step 4: Attach the Patch to the Beanie
Once your patch design is pressed and cooled, attach it to the beanie using one of two methods:
Option 1: Heat-Bond / Fusible Adhesive
- Apply fusible web or heat-n-bond backing to your patch.
- Position the patch on the beanie cuff.
- Use a lower heat setting and longer dwell time (since knit can be heat-sensitive).
- Cover with parchment or Teflon, press carefully, and let cool fully before handling.
Option 2: Stitch-On
- Sew the patch onto the beanie using tight, clean stitches around the edge.
- Avoid stitching through the HTV itself—stick to the border.
Step 5: Quality Check & Tips
- Once cooled, flex the patch and hat gently to test adhesion.
- If edges lift, re-press lightly with added pressure.
- Avoid pressing the beanie again after the patch is attached to prevent warping.
- For best results, hand wash and air dry.

Troubleshooting Common Issues
|
Problem |
Likely Cause |
Fix |
|
Edge lifting |
Not enough pressure or time |
Increase press time or pressure slightly. |
|
Missing fine details |
HTV too thick for small elements |
Simplify design. |
|
Uneven bond |
Patch too textured or compressing |
Use a smoother patch fabric or firmer platen. |
|
Patch slipping |
Beanie stretch or movement |
Stabilize with fusible web or clips before pressing. |
Final Thoughts
Pressing brick HTV onto a patch and then applying it to a beanie gives you the perfect combo of texture, durability, and creative freedom. The 3D effect of brick HTV stands out beautifully against soft knit fabrics, while the patch approach ensures a cleaner press and longer-lasting result.
Experiment with patch shapes, textures, and placements—you’ll love how custom and professional your finished beanies look!