")
Jan 16th 2020
Top 5 Tips for Working with Glitter Heat Transfer Vinyl (HTV)
Glitter heat transfer vinyl (HTV) can add the perfect sparkle to your projects—but it also comes with a few quirks that make it trickier than smooth HTV. Whether you’re brand new to glitter vinyl or just looking to refine your technique, these tips will help you save time, reduce frustration, and create designs that shine.

Tip 1: Master the Inlay Technique
So, what exactly is an inlay?
An inlay design is when you cut out (or “knock out”) sections of one glitter vinyl so another color of glitter can fit perfectly into those spaces—like a puzzle. This is the best way to combine glitter colors because glitter’s textured surface isn’t a reliable base for another layer of adhesive.
Instead of trying to stick glitter on top of glitter (which won’t hold up well), use an inlay design to get crisp, clean lines and a flawless multi-glitter look.
Check out our guide to inlaying glitter HTV here.

Tip 2: Keep Details Bold and Simple
If you’ve never cut glitter vinyl before, this one’s a game-changer. Glitter HTV is 325–375 microns thick — about 3.5 times thicker than smooth HTVs like EasyWeed or ThermoFlex Plus. Not only that, but the way glitter is manufactured makes it more brittle, which means tiny cutouts and delicate swirls are prone to breaking.
When working with glitter:
- Avoid intricate scroll fonts and super-fine lines.
- Stick to bold text and larger, simpler shapes.
- Save those delicate details for smooth or stretch HTVs.
Your cutting machine (and your sanity while weeding!) will thank you.

Tip 3: Glitter Goes on Top—Always
When it comes to layering HTV, glitter should always be the final, top layer. Why? The textured surface of glitter doesn’t provide a solid grip for other vinyls to adhere to. If you try layering smooth HTV on top, it’s likely to peel up after a few washes.
Want to use more than one glitter color in your design? Go back to Tip 1 and use an inlay method instead. This ensures your project looks amazing and lasts through wear and washing.
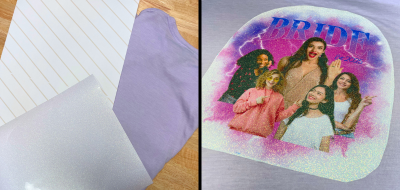
Tip 4: Sublimate on White Glitter for Extra Flair
Here’s a fun trick many crafters don’t know: you can dye sublimate onto white textured glitter HTV! This opens up endless design possibilities—imagine custom patterns, logos, or even full-color images shining on top of a glitter base.
It’s a fantastic way to make your glitter designs stand out while adding your own creative twist. (Check out our tutorial here for step-by-step guidance.)
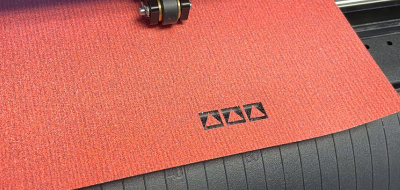
Tip 5: Always Test Cut First
If you take only one thing from this list, let it be this: always, always do a test cut. Glitter HTV behaves differently than smooth HTV, so even if you’ve cut vinyl a hundred times before, your usual settings might not work.
A simple test cut involves making a small square (about 1 cm) with a tiny triangle inside it. This lets you check your speed and force (or pressure) before committing to a full design. It’s a small step that can save you from wasting big sheets of vinyl.
Final Thoughts
Glitter HTV might be thicker and trickier to handle, but once you get the hang of it, the results are totally worth it. Stick to bold designs, remember that glitter goes on top, and don’t skip your test cuts—and your projects will sparkle every time.